We needed a double bed frame for my son, who was heading off to university. It seemed like a great DIY Bed Frame project.
Project Guiding Principles
-
- Easy to build – This wasn’t going to be a fine woodworking project with attention to every detail. I wanted to complete it in a weekend.
-
- Cost-effective – I wanted this to cost less than $100. It was a student’s university bed frame. While I get a lot of satisfaction from building things, if it costs double what you can purchase from a store, it makes it hard to justify a DIY project.
-
- Easy re-assembly – We needed to transport the frame, so it needed to break down into individual wood planks and be relatively easy to assemble. It also had to be durable enough for repeated re-assemblies.
-
- Looks good – While not a fine woodworking project, I still wanted a clean design and to avoid big lag bolts just being screwed into the ends to hold it together.
Design Decisions
-
- Use of standard lumber
-
- This helped keep costs to a minimum.
-
- Therefore, I used knotty pine 2×6’s for the rails, 2×4’s for the legs and rail supports, and 1×3 strapping for the bed support.
-
- Tip: Be selective at big box stores! Home Depot lumber can be notoriously warped. Sift through the pile and pick out the gems that are dry, straight, and have minimal knots. I’ve been successful using this type of lumber on many home furniture projects.
-
- Use of barrel nuts and threaded inserts – These support multiple re-assemblies and ongoing strength. The frame needed to completely collapse for transport, which wouldn’t have been possible if I just used screws or lag bolts into pine.
-
- Use of 1×3 strapping for the bed mattress support – This lumber is super cheap but requires a middle support. These strappings would loosely sit on the rail supports and need spacers to keep them perpendicular to the rail. I recall an old Ikea bed that had a similar support system, and the boards would rack around and could fall off if moved too much.
Design and Build Steps
Measure dimensions of your mattress
I had a standard double futon mattress, which drove the basic frame outline. Knowing we wanted some space under the bed for storage while keeping it relatively low, I was ready to draft it up on CAD.
CAD Design – Fusion 360 design
You can draft your design on graph paper, as I have done for numerous projects. However, spending the time to learn some CAD will save you headaches in the future. This was a pretty simple design, but I found that in a 3D space, where our end project lives, I would often have measurement errors that I missed drawing in 2D orthographic views.


Project Parts


Ripping Parts to Length
-
- Since we are using dimensional lumber, I only needed to use my compound miter saw to cut the rails, legs, and supports to length. See the diagram for dimensions used.
-
- For the shorter pieces where possible, use a stop block. It enables far better repeatability in your cuts and is faster!


Pre-Sanding
The bed rails will be painted, so the finish does not need to be super smooth or close to a fine woodworking grade finish. Since this is cheap, rough lumber, doing a coarse grit sanding with 80 or 120 grit before assembly will make the final finish prep much easier and quicker.

Attach Rail Supports
-
- Following the measurements in the drawing, use a combination of glue and wood screws.
-
- Tip: The glue has sufficient hold strength, but when you start clamping long pieces of wood with glue, you will find it’s a challenge to keep everything aligned. That’s where the wood screws help. The screws will not be seen, so this is not a concern.


Bed Legs Fabrication
-
- I opted to construct the legs by gluing up 2×4’s and ripping and squaring them to size on the table saw.
-
- This is a straightforward glue and clamp job.
-
- Ripping on the table saw, I did this in two passes by setting the blade height just past half the depth of the leg.
-
- Note: You want to rip both sides of the leg. This gets rid of the rounded edge on dimensional lumber that you can see when it’s glued up. Since we are painting them, the end result is pretty transparent.


Rails Assembly
-
- The side and end rails are attached at the corner with barrel nuts.
-
- My rationale for using these is you can assemble on the spot and re-assemble as many times as you want without concern of stripping wood if, for example, you used lag bolts into pine. They also make for a strong corner connection.
-
- That being said, probably the one part of the design that I would likely change. It was a bit of a pain getting them fine-tuned for and aligned for the bolt to thread into the barrel nut during assembly. I would probably opt for threaded inserts into the leg, in a similar fashion as depicted in the “Installing Threaded Insert with Jig” image below if doing this again.
-
- First step is making an accurate measurement of where you place the bolt hole in the side rails. Use a center punch so your drill doesn’t wander and is exactly where intended.

Mark the holes for the end rail by using the holes drilled above as a guide. It’s important these are accurate. Clamp your pieces together and keep your drill as perpendicular as possible.

-
- Measure where the barrel nut will be placed. The bolt will be offset 1.5″ due to the thickness of the side rail, as shown in the image.
-
- I used a large Forstner bit as it gives a nice flat bottom. Your depth is tricky. It needs to be about 1/2 the thickness of the barrel nut past the hole you drilled in the prior step so that when you insert the bolt, it can mate with it. This is the part I mentioned above that made assembly more complicated than necessary. If you don’t get this right, it’s a challenge to hold the nut in place.
-
- Tip!: Number and mark your corners! Using dimensional lumber, your parts won’t be perfectly square. So if you start mixing and matching how things will assemble, you are in for a headache as your holes will not align.


Leg Pre-Assembly
-
- The legs will be assembled to the rail using bolts and threaded inserts.
-
- The rationale is ease of assembly and for re-assembly as no risk of stripping of wood.
-
- Note – Threaded inserts require you to be accurate on your holes and alignment! If you are not dead on, the bolt inserted through a 3″ leg will not align with your insert.
-
- I used a drill press to ensure my hole was perpendicular. If you don’t have that, use a scrap piece of wood as guide or something that will keep your drill square to the piece.

Use the leg holes as your guide to drill/mark the holes for the threaded inserts. This will be much better than trying to measure.

I used calipers to get the outside dimension of the threaded insert to select my drill bit.

Tape off the depth of your drill which should be a little past the depth of the insert. Keep your drill perpendicular.

-
- TIP – Installing threaded inserts can be tricky. They will have a tendency to wander and go on a bit of an angle. If it does, you are in for a headache as your bolt will not align and thread into it. I built a simple jig like in the below image to help thread the insert. Google it and you can find examples of this. Basically you screw the insert in with the bolt which is kept perpendicular by the jig.
-
- TIP – as with the rails, number your legs and do not mix and match which corners they will be assembled! Having a long bolt perfectly mate to a threaded insert needs an accurate measurement and if use each individual leg as the guide as I recommended above, you will inevitably have some minor variation making it very difficult if not impossible during assembly.


Leg and Rail Assembly
-
- This is where the rubber meets the road!
-
- Rail Assembly is first as one of the barrel nuts is actually covered by the leg which you can see in the image below. Again, I found it difficult to get the bolt and nut to align, but when I did, that combination make for a great fastener for this type of application
-
- Legs are then installed with the bolts to the respective threaded inserts

Middle Support Assembly
-
- The support for the 1×3’s is a 2×4 in the middle running the length of the bed.
-
- To keep this simple and cheap, I used a joist hanger. You will not see it, so while it is “ugly” its quick and functional
-
- TIP – to measure the height location of where to put attach the joist hanger, simply lay one of the 1×3’s across and bring up the 2×4 while it is already in the hanger to the point where it touches. Then pop in a screw to hold it. I tried measuring at first and in the end, this is just far easier, more accurate and faster.


Cutting Mattress support spacers
-
- To prevent your 1×3 mattress supports from moving too much, you need to have some spacers. This was my preferred approach than screwing into place as assembly at university is much easier!
-
- You are making a lot of the same cuts so use a stop block for repeatability and accuracy as shown in the image.

Assembly of Bed Support Spacers
-
- I used a bit of glue and brad nails to attached spacers into place.
-
- Use one of the 1×3’s and a small offset spacer as your guides and just repeat along the whole rail.


Sanding
As we were painting the bed frame, I did not do a tremendous amount of sanding. I sanded all the parts down to I believe 120 grit. You can do 220 grit but likely overkill. If you want to stain, I would go to 220 grit.

Priming and Painting
-
- TIP – with Knotty Pine, you will need to use a primer that seals the knots. We used the Zinsser BIN 2 product. Be generous on the knots themselves. If you do not, after some months you will notice a stain weeping through you paint.
-
- For paint we used Benjamin Moore Carolina Gull 2138-40: Regal Select Soft Gloss finish. Benjamin Moore has premium quality durable paints, and the Regal Select Soft Gloss finish is very easy to clean. However for a painted bedframe ideally we would recommend using BM Advance, a waterborne alkyd paint, instead as it’s more resistant to scuffing.


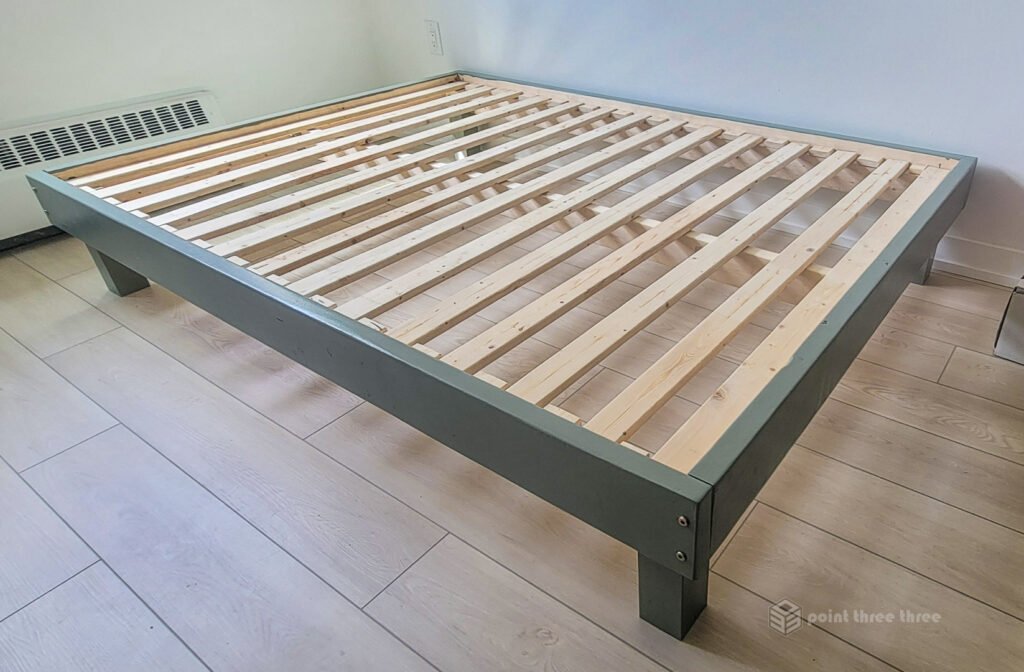
Overall this was a fairly straightforward project which met our initial design goals. You can adapt this design to other bed sizes by just changing the dimensions.
Hopefully this helps inspire your own DIY bed frame design and build!
If you are looking for another great DIY project to challenge yourself, check out my DIY Planter Box blog.